How can I help you?
Getting Started with Syncfusion® JavaScript (Essential® JS 2) library and SharePoint Framework (SPFx)
7 May 20254 minutes to read
This article provides a step-by-step introduction to configure Syncfusion® JavaScript (Essential® JS 2) library and build a simple SharePoint framework application in Visual Studio Code.
Prerequisites
Setup development environment
1.Create a new directory ej2-sharepoint, open the command prompt from that directory, and install the required SharePoint client-side development tools with global flag.
on Windows:
npm install -g yo gulp @microsoft/generator-sharepoint
on OSX / LINUX
sudo npm install -g yo gulp @microsoft/generator-sharepoint
> The Yeoman SharePoint web part generator [`@microsoft/generator-sharepoint`](https://www.npmjs.com/package/@microsoft/generator-sharepoint) helps to create a SharePoint client-side project using [`Yeoman`](http://yeoman.io/) tool.
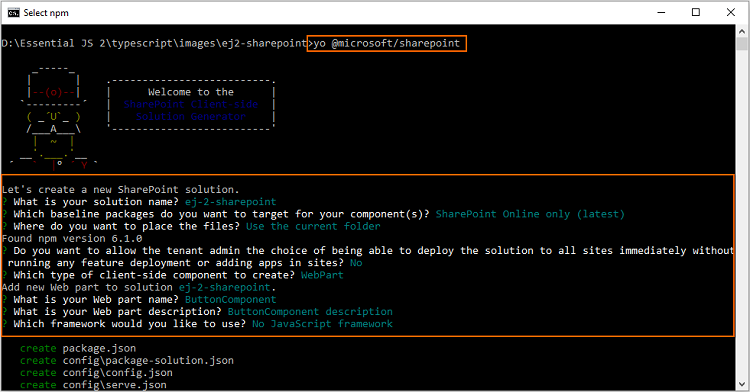
2.Then, create a new client-side web part by running the Yeoman SharePoint Generator.
yo @microsoft/sharepoint
3.Set up the following options when the above command is prompted.
1. Accept the default **ej-2-sharepoint** as your solution name, and then press the <kbd>Enter</kbd> key.
2. Choose **SharePoint Online only (latest)**, and press the <kbd>Enter</kbd> key.
3. Choose **Use the current folder** to place the files in current location, and press the <kbd>Enter</kbd> key.
4. Type **N** to require the extension to be installed on each site explicitly when it is being used.
5. Choose **WebPart** as the client-side component type to be created.

Next, it will ask the specific information about the web part.

1. Change the **ButtonComponent** as your web part name, and then press the <kbd>Enter</kbd> key.
2. Accept the default **ButtonComponent description** as your web part description, and then press the <kbd>Enter</kbd> key.
3. Accept the default **No javascript framework** as the framework, and then press the <kbd>Enter</kbd> key.

4.After configuring the above setup, the Yeoman generator will create the SharePoint client-side web part under ej2-sharepoint folder and install the required default dependencies.
Configure Syncfusion® JavaScript UI control in application
1.Install the @syncfusion/ej2 npm package in the application using the following command line.
npm install @syncfusion/ej2 --save
2.Open the SharePoint application in Visual Studio Code, and add the Syncfusion® JavaScript Button control script and styles in the ~/src/webparts/buttonComponent/ButtonComponentWebPart.ts file.
1. Import the Button source and add Syncfusion<sup style="font-size:70%">®</sup> JavaScript style reference at the top of the file.
2. Add the HTML button element in `this.domElement.innerHTML`, and initialize the Syncfusion<sup style="font-size:70%">®</sup> JavaScript Button in the `render()` method of `ButtonComponentWebPart` class.
    ....
    ....

    import styles from './ButtonComponentWebPart.module.scss';
    import * as strings from 'ButtonComponentWebPartStrings';

    // import Essential JS 2 Button
    import { Button } from '@syncfusion/ej2-buttons';

    // add Syncfusion Essential JS 2 style reference from node_modules
    require('../../../node_modules/@syncfusion/ej2/fabric.css');

    ....
    ....

    export default class ButtonComponentWebPart extends BaseClientSideWebPart<IButtonComponentWebPartProps> {

        public render(): void {
        this.domElement.innerHTML = `
            <div class="${ styles.buttonComponent }">
                ....
                ....

                <!--HTML button element, which is going to render as Essential JS 2 Button-->
                <button id="normalbtn">Essential JS 2 Button</button>
            </div>`;

            // initialize button control
            let button: Button = new Button();

            // render initialized button
            button.appendTo('#normalbtn');
        }

        ....
        ....
    }
3.Run the application using the following command line, and the Syncfusion® JavaScript Button control will be rendered in web browser.
gulp serve
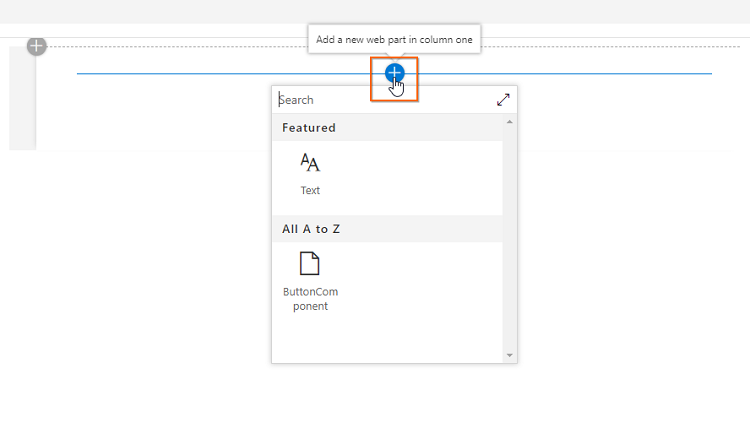
Click the `Add a new web part in column one`.

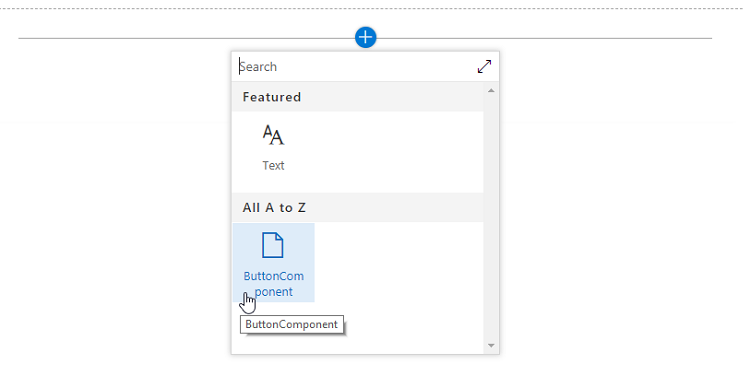
Select the `ButtonComponent` web part.

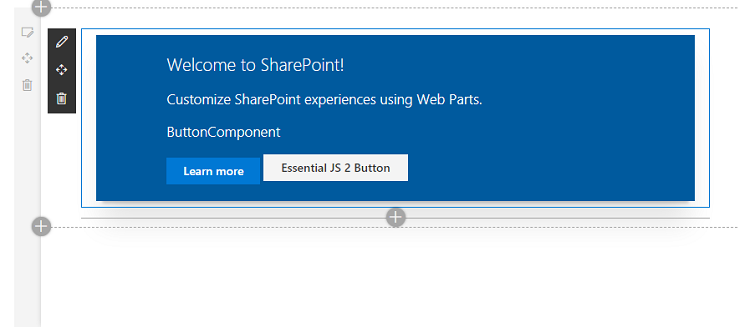
Finally, the Syncfusion<sup style="font-size:70%">®</sup> JavaScript Button control is rendered in the SharePoint Framework client-side web part.
