How can I help you?
Drag and Drop
2 Mar 202511 minutes to read
The TreeView control allows you to drag and drop any node by setting the allowDragAndDrop to true. Nodes can be dragged and dropped at all levels of the same TreeView.
The dragged nodes can be dropped at any level by indicator lines with line, plus/minus, and restrict icons. It represents the exact position where the node is to be dropped as sibling or child.
The following table explains the usage of indicator icons.
| Icons | Description |
|---|---|
| Plus icon | Indicates that the dragged node is to be added as child of target node. |
| Minus or restrict icon | Indicates that the dragged node is not to be dropped at the hovered region. |
| In-between icon | Indicates that the dragged node is to be added as siblings of hovered region. |
-
To prevent dragging action for a particular node, you can use the
nodeDragStartevent, which is triggered when the node drag is started. If you need to prevent dropping action for a particular node, thenodeDragStopevent can be used which is triggered when the drag is stopped. -
The
nodeDraggingevent is triggered when the TreeView node is being dragged. You can customize the cloned element in this event. -
The
nodeDroppedevent is triggered when the TreeView node is dropped on the target element successfully.
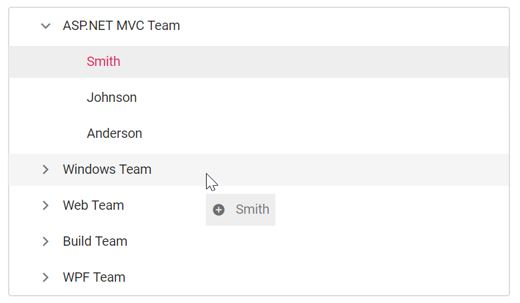
In the following sample, the allowDragAndDrop property is enabled.
@Html.EJS().TreeView("treedata").AllowDragAndDrop(true).Fields(field=>
    field.Selected("is_selected").Id("id").ParentID("pid").Text("name").HasChildren("hasChild").Expanded("expanded")
    .DataSource(ViewBag.dataSource)).Render()
using Syncfusion.EJ2.Navigations;
public ActionResult DragAndDrop()
{
List<object> treedata = new List<object>();
treedata.Add(new { id = 1, name = "Australia", hasChild = true, expanded = true });
treedata.Add(new { id = 2, pid = 1, name = "New South Wales", is_selected = true });
treedata.Add(new { id = 3, pid = 1, name = "Victoria" });
treedata.Add(new { id = 4, pid = 1, name = "South Australia" });
treedata.Add(new { id = 6, pid = 1, name = "Western Australia", is_selected = true });
treedata.Add(new { id = 7, name = "Brazil", hasChild = true });
treedata.Add(new { id = 8, pid = 7, name = "Paraná" });
treedata.Add(new { id = 9, pid = 7, name = "Ceará" });
treedata.Add(new { id = 10, pid = 7, name = "Acre" });
treedata.Add(new { id = 11, name = "China", hasChild = true });
treedata.Add(new { id = 12, pid = 11, name = "Guangzhou" });
treedata.Add(new { id = 13, pid = 11, name = "Shanghai" });
treedata.Add(new { id = 14, pid = 11, name = "Beijing" });
treedata.Add(new { id = 15, pid = 11, name = "Shantou" });
treedata.Add(new { id = 16, name = "France", hasChild = true });
treedata.Add(new { id = 17, pid = 16, name = "Pays de la Loire" });
treedata.Add(new { id = 18, pid = 16, name = "Aquitaine" });
treedata.Add(new { id = 19, pid = 16, name = "Brittany" });
treedata.Add(new { id = 20, pid = 16, name = "Lorraine" });
treedata.Add(new { id = 21, name = "India", hasChild = true });
treedata.Add(new { id = 22, pid = 21, name = "Assam" });
treedata.Add(new { id = 23, pid = 21, name = "Bihar" });
treedata.Add(new { id = 24, pid = 21, name = "Tamil Nadu" });
ViewBag.dataSource = treedata;
return View();
}The output will look like the image below:
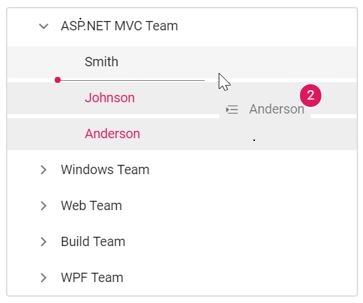
Multiple-node drag and drop
To drag and drop more than one node, you should enable both the allowMultiSelection and allowDragAndDrop properties.
To perform multi-selection, press and hold CTRL key and click the desired nodes. To select a range of nodes, press and hold the SHIFT key and click the nodes.
In the following sample, the allowMultiSelection property is enabled along with the allowDragAndDrop property.
@Html.EJS().TreeView("treedata").AllowDragAndDrop(true).AllowMultiSelection(true).Fields(field=>
    field.Selected("is_selected").Id("id").ParentID("pid").Text("name").HasChildren("hasChild").Expanded("expanded")
    .DataSource(ViewBag.dataSource)).Render()
using Syncfusion.EJ2.Navigations;
public ActionResult MultipleNodes()
{
List<object> treedata = new List<object>();
treedata.Add(new { id = 1, name = "Australia", hasChild = true, expanded = true });
treedata.Add(new { id = 2, pid = 1, name = "New South Wales", is_selected = true });
treedata.Add(new { id = 3, pid = 1, name = "Victoria" });
treedata.Add(new { id = 4, pid = 1, name = "South Australia" });
treedata.Add(new { id = 6, pid = 1, name = "Western Australia", is_selected = true });
treedata.Add(new { id = 7, name = "Brazil", hasChild = true });
treedata.Add(new { id = 8, pid = 7, name = "Paraná" });
treedata.Add(new { id = 9, pid = 7, name = "Ceará" });
treedata.Add(new { id = 10, pid = 7, name = "Acre" });
treedata.Add(new { id = 11, name = "China", hasChild = true });
treedata.Add(new { id = 12, pid = 11, name = "Guangzhou" });
treedata.Add(new { id = 13, pid = 11, name = "Shanghai" });
treedata.Add(new { id = 14, pid = 11, name = "Beijing" });
treedata.Add(new { id = 15, pid = 11, name = "Shantou" });
treedata.Add(new { id = 16, name = "France", hasChild = true });
treedata.Add(new { id = 17, pid = 16, name = "Pays de la Loire" });
treedata.Add(new { id = 18, pid = 16, name = "Aquitaine" });
treedata.Add(new { id = 19, pid = 16, name = "Brittany" });
treedata.Add(new { id = 20, pid = 16, name = "Lorraine" });
treedata.Add(new { id = 21, name = "India", hasChild = true });
treedata.Add(new { id = 22, pid = 21, name = "Assam" });
treedata.Add(new { id = 23, pid = 21, name = "Bihar" });
treedata.Add(new { id = 24, pid = 21, name = "Tamil Nadu" });
ViewBag.dataSource = treedata;
return View();
}The output will look like the image below: