Image
7 Jun 202417 minutes to read
Rich Text Editor allows to insert images from online sources as well as local computer where you want to insert the image in your content. For inserting the image to the Rich Text Editor, the following list of options have been provided in the InsertImageSettings
| Options | Description |
|---|---|
| AllowedTypes | Specifies the extensions of the image types allowed to insert on bowering and passing the extensions with comma separators. For example, pass allowedTypes as .jpg and .png. |
| Display | Sets the default display for an image when it is inserted in to the Rich Text Editor. Possible options are: ‘inline’ and ‘break’. |
| Width | Sets the default width of the image when it is inserted in the Rich Text Editor. |
| Height | Sets the default height of the image when it is inserted in the Rich Text Editor. |
| SaveUrl | Provides URL to map the action result method to save the image. |
| Path | Specifies the location to store the image. |
| Resize | To enable resizing for image element. |
| MinWidth | Defines the maximum Width of the image. |
| MaxWidth | Defines the maximum Width of the image. |
| MinHeight | Defines the minimum Height of the image. |
| MaxHeight | Defines the maximum Height of the image. |
| ResizeByPercent | Image resizing should be done by percentage calculation. |
Upload Options
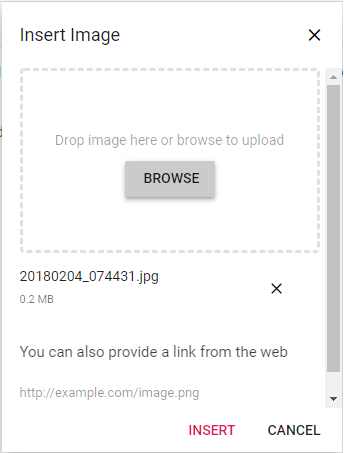
Through the browse option in the Image dialog, select the image from the local machine and insert into the Rich Text Editor content.
If the path field is not specified in the InsertImageSettings, the image will be converted into blob url for the image will be created and the generated url will be set as src property of <img> tag as below.
<img src="blob:http://ej2.syncfusion.com/3ab56a6e-ec0d-490f-85a5-f0aeb0ad8879" >NOTE
If you want to insert a lot of tiny images in the editor and don’t want a specific physical location for saving images, you can opt to save format as Base64.
In the below sample, the image has been load from the local machine and it will be saved in the given location.
@Html.EJS().RichTextEditor("image").ToolbarSettings(e => e.Items((object)ViewBag.items)).InsertImageSettings(obj => obj.Display("inline")).ContentTemplate(@<div>
<p>
The Rich Text Editor control is WYSIWYG ('what you see is what you get') editor that provides the best user experience to create and update the content.
Users can format their content using standard toolbar commands.
</p>
<p><b> Key features:</b></p>
<ul>
<li><p> Provides < IFRAME > and < DIV > modes </p></li>
<li><p> Capable of handling markdown editing.</p></li>
<li><p> Contains a modular library to load the necessary functionality on demand.</p></li>
<li><p> Provides a fully customizable toolbar.</p></li>
<li><p> Provides HTML view to edit the source directly for developers.</p></li>
<li><p> Supports third - party library integration.</p></li>
<li><p> Allows preview of modified content before saving it.</p></li>
<li><p> Handles images, hyperlinks, video, hyperlinks, uploads, etc.</p></li>
<li><p> Contains undo / redo manager.</p></li>
<li><p> Creates bulleted and numbered lists.</p></li>
</ul>
</div>).Render()public class HomeController : Controller
{
public ActionResult Index()
{
ViewBag.items = new[] { "Image" };
return View();
}
}Server Side Action
The selected image can be uploaded to the required destination by using the below controller action. Map this method name in saveUrl property of InsertImageSettings and provide required destination path through path property.
NOTE
The runnable demo application is available in this Github repository.
@Html.EJS().RichTextEditor("defaultRTE").InsertImageSettings(obj => obj.SaveUrl("/Home/SaveImage").Path("../Uploads/")).Render()using System.IO;
using System.Web;
using System.Web.Mvc;
namespace ImageUpload.Controllers
{
public class HomeController : Controller
{
public ActionResult Index()
{
return View();
}
[AcceptVerbs("Post")]
public void SaveImage(HttpPostedFileBase UploadFiles)
{
if (UploadFiles != null)
{
string path = Server.MapPath("~/Uploads/");
// Create a new directory, if it does not exists
if (!Directory.Exists(path))
{
Directory.CreateDirectory(path);
}
// Save a image file in directory
UploadFiles.SaveAs(path + Path.GetFileName(UploadFiles.FileName));
}
}
}
}Image Delete
If you want to remove am image from the Rich Text Editor content, select the image and click “Remove” tool from quick toolbar. It will delete the image from the Rich Text Editor content.
Once you select the image from the local machine, the URL for the image will be generate, from there also you remove the image from the service location through the clicking of cross icon as below in the image.

The following sample explains, how to configure RemoveUrl to remove a saved image from the remote service location, when the following image remove actions are performed:
-
deletekey action. -
backspacekey action. - Removing uploaded image file from the insert image dialog.
- Deleting image using the quick toolbar
removeoption.
@Html.EJS().RichTextEditor("RteImage").InsertImageSettings(obj => obj.SaveUrl("/Home/SaveImage").RemoveUrl("/Home/RemoveImage").Path("../Uploads/")).Render()public class HomeController : Controller
{
public ActionResult Index()
{
return View();
}
[AcceptVerbs("Post")]
public void SaveImage(HttpPostedFileBase UploadFiles)
{
try
{
if (UploadFiles != null)
{
string fileName = UploadFiles.FileName;
var fileSave = System.Web.HttpContext.Current.Server.MapPath("~/Uploads");
// Create a new directory, if it does not exists
if (!System.IO.Directory.Exists(fileSave))
{
System.IO.Directory.CreateDirectory(fileSave);
}
var fileSavePath = Path.Combine(fileSave, fileName);
// Save the image
UploadFiles.SaveAs(fileSavePath);
Response.StatusCode = 200;
Response.ContentType = "application/json; charset=utf-8";
}
}
catch (Exception)
{
Response.StatusCode = 204;
}
}
[AcceptVerbs("Post")]
public void RemoveImage(HttpPostedFileBase UploadFiles)
{
try
{
if (UploadFiles != null)
{
// Do remove action here
Response.StatusCode = 200;
Response.ContentType = "application/json; charset=utf-8";
}
}
catch (Exception)
{
Response.StatusCode = 204;
}
}
}Insert from Web
If you want to insert an image from online source like Google, Ping, etc., you need to enable images tool on the editor’s toolbar. By default, the images tool is open an image dialog which allows you to insert an image from online source.
Dimension
Sets the default width and height of the image when it is inserted in the Rich Text Editor using Width and Height of InsertImageSettings.
Through the quickToolbar, also you can change the width and height using Change Size option. Once click into the option. The Image Size dialog will open as below. In that specify the width and height of the image in pixel.

Caption and Alt Text
Image caption and alternative text can be specified for the inserted image in the Rich Text Editor through the QuickToolbarSettings options such as Image Caption and Alternative Text.
Through the Alternative Text option, set the alternative text for the image, when the image is not upload successfully into the Rich Text Editor.
By clicking the Image Caption, the image will get wrapped in an image element with a caption. Then, you can type caption content inside the Rich Text Editor.
Display Position
Sets the default display for an image when it is inserted in the Rich Text Editor using Display field in InsertImageSettings. It has two possible options: ‘inline’ and ‘break’.
@Html.EJS().RichTextEditor("image").ToolbarSettings(e => e.Items((object)ViewBag.items)).ContentTemplate(@<div>
<p>
The Rich Text Editor control is WYSIWYG ('what you see is what you get') editor that provides the best user experience to create and update the content.
Users can format their content using standard toolbar commands.
</p>
<p><b> Key features:</b></p>
<ul>
<li><p> Provides < IFRAME > and < DIV > modes </p></li>
<li><p> Capable of handling markdown editing.</p></li>
<li><p> Contains a modular library to load the necessary functionality on demand.</p></li>
<li><p> Provides a fully customizable toolbar.</p></li>
<li><p> Provides HTML view to edit the source directly for developers.</p></li>
<li><p> Supports third - party library integration.</p></li>
<li><p> Allows preview of modified content before saving it.</p></li>
<li><p> Handles images, hyperlinks, video, hyperlinks, uploads, etc.</p></li>
<li><p> Contains undo / redo manager.</p></li>
<li><p> Creates bulleted and numbered lists.</p></li>
</ul>
</div>).InsertImageSettings(obj => obj.Display("break")).Render()public class HomeController : Controller
{
public ActionResult Index()
{
ViewBag.items = new[] { "Image" };
return View();
}
}Image with Link
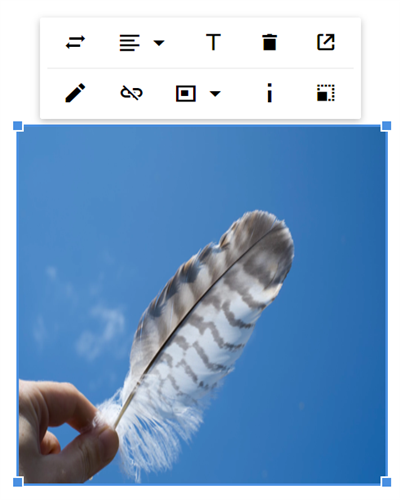
The hyperlink itself can be an image in Rich Text Editor. If the image given as hyperlink, the remove, edit and open link will be added to the quick toolbar of image as below. For further details about link, see the link documentation.

Drag and Drop
By default, the Rich Text Editor allows you to insert images by drag-and-drop from the local file system such as Windows Explorer into the content editor area. And, you can upload the images to the server before inserting into the editor by configuring the saveUrl property. The images can be repositioned anywhere within the editor area by dragging and dropping the image.
In the following sample, you can see feature demo.
@Html.EJS().RichTextEditor("drag-drop").InsertImageSettings(obj => obj.SaveUrl("https://aspnetmvc.syncfusion.com/services/api/uploadbox/Save")).ContentTemplate(@<div><p>
The Rich Text Editor control is WYSIWYG ('what you see is what you get') editor that provides the best user experience to create and update the content.
Users can format their content using standard toolbar commands.
</p>
<p><b> Key features:</b></p>
<ul>
<li><p> Provides < IFRAME > and < DIV > modes </p></li>
<li><p> Capable of handling markdown editing.</p></li>
<li><p> Contains a modular library to load the necessary functionality on demand.</p></li>
<li><p> Provides a fully customizable toolbar.</p></li>
<li><p> Provides HTML view to edit the source directly for developers.</p></li>
<li><p> Supports third - party library integration.</p></li>
<li><p> Allows preview of modified content before saving it.</p></li>
<li><p> Handles images, hyperlinks, video, hyperlinks, uploads, etc.</p></li>
<li><p> Contains undo / redo manager.</p></li>
<li><p> Creates bulleted and numbered lists.</p></li>
</ul></div>).Render()public class HomeController : Controller
{
public ActionResult Index()
{
return View();
}
}Drag and drop with specific extension images
You can allow the specific images alone to be uploaded using the the allowedTypes property. By default, the Rich Text Editor allows the JPG, JPEG, and PNG formats. You can configure this formats as follows.
    insertImageSettings: {
      allowedTypes: ['.jpg']
    }
Prevent drag and drop action
You can prevent drag-and-drop action by setting the actionBegin argument cancel value to true. The following code shows how to prevent the drag-and-drop.
    function actionBegin(args) {
        if(args.type === 'drop' || args.type === 'dragstart') {
            args.cancel =true;
        }
    }