Install Syncfusion ASP.NET MVC NuGet Packages
17 Aug 20268 minutes to read
This guide explains how to install the Syncfusion® ASP.NET MVC (EJ2) NuGet packages the Package Manager Console in Visual Studio.
Prerequisites
- Visual Studio 2017 or later with the ASP.NET and web development workload installed.
- The [.NET Framework] 4.5.2 or later installed.
- An existing ASP.NET MVC web application (or a new one created through File → New → Project → ASP.NET Web Application (.NET Framework) with the MVC template).
- A Syncfusion® account, or a Syncfusion® unlock key for the target version.
Overview
NuGet is a Package management system for Visual Studio. It makes it easy to add, update and remove external libraries in our application. Syncfusion® publishes all ASP.NET MVC (EJ2) NuGet packages on nuget.org. The Syncfusion® ASP.NET MVC (EJ2) NuGet packages can be used without installing the Syncfusion® setup. You can simply reference the Syncfusion® ASP.NET MVC (EJ2) NuGet packages in an ASP.NET MVC application to develop with the Syncfusion® ASP.NET MVC (EJ2) components.
The
Syncfusion.EJ2.MVC5NuGet package, which contains all Syncfusion® ASP.NET MVC (EJ2) components in a single package, is available beginning with v16.1.0.24 (Essential Studio® 2018 Volume 1).
Installation Using the Package Manager UI
The NuGet Package Manager UI allows you to search, install, uninstall, and update Syncfusion® ASP.NET MVC (EJ2) NuGet packages in your applications and solutions. You can find and install the Syncfusion® ASP.NET MVC (EJ2) NuGet packages in your Visual Studio ASP.NET MVC web application, and this process is easy with the steps below:
-
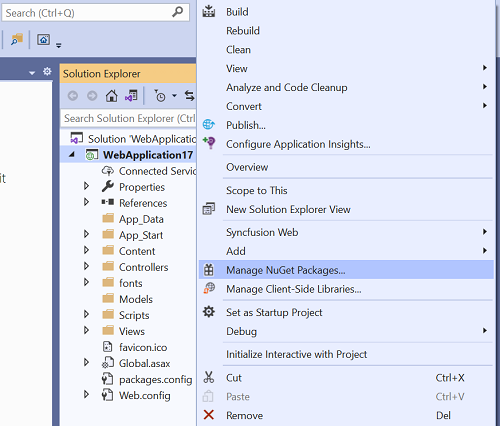
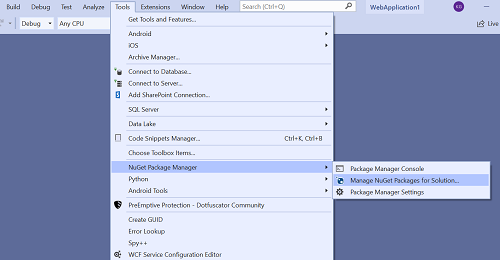
To open the Manage NuGet packages UI, follow either one of the options below:
Option 1:
Right-click on the ASP.NET MVC web application or solution in the Solution Explorer, and choose Manage NuGet Packages…
Option 2:
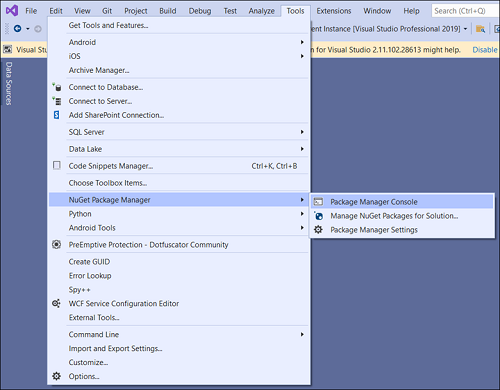
After opening the ASP.NET MVC web application in Visual Studio, go to the Tools menu and, after hovering NuGet Package Manager, select Manage NuGet Packages for Solution…
-
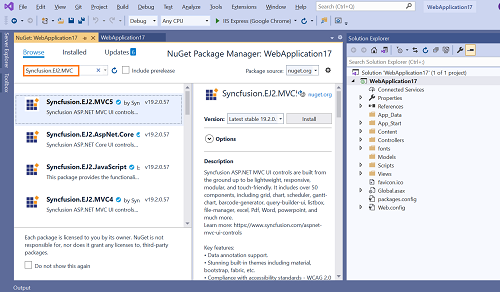
The Manage NuGet Packages window will open. Navigate to the Browse tab, then search for the Syncfusion® ASP.NET MVC (EJ2) NuGet packages using a term like
Syncfusion.EJ2.MVC5, and select the appropriate Syncfusion® ASP.NET MVC NuGet package for your development.The nuget.org package source is selected by default in the Package source drop-down. If your Visual Studio does not have nuget.org configured, follow the instructions in the Microsoft docs to set up the nuget.org feed URL.
-
When you select a package, the right side panel will provide more information about it.
-
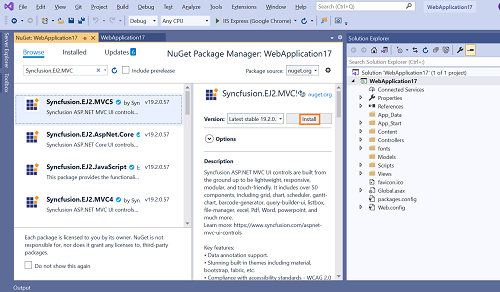
By default, the package is selected with the latest version. You can choose the required version and click the Install button and accept the license terms. The package will be added to your ASP.NET MVC application.
-
At this point, your application has all the required Syncfusion® assemblies, and you will be ready to start building high-performance, responsive apps with Syncfusion® ASP.NET MVC (EJ2) components. Also, you can refer to the ASP.NET MVC (EJ2) help documentation for development.
Installation Using the Package Manager Console
The Package Manager Console saves NuGet package installation time since you don’t have to search for the Syncfusion.EJ2.MVC5 NuGet package you want to install — you can just type the installation command. Follow the instructions below to use the Package Manager Console to reference the Syncfusion® ASP.NET MVC (EJ2) component as a NuGet package in your ASP.NET MVC web application.
-
To show the Package Manager Console, open your ASP.NET MVC web application in Visual Studio and navigate to Tools → NuGet Package Manager → Package Manager Console.
-
The Package Manager Console will be shown at the bottom of the screen. You can install the Syncfusion® ASP.NET MVC (EJ2) NuGet packages by entering the following NuGet installation commands.
Install the specified Syncfusion® ASP.NET MVC (EJ2) NuGet package
The command below installs the Syncfusion® ASP.NET MVC (EJ2) NuGet package in the default ASP.NET MVC application:
Install-Package <PackageName>For example:
Install-Package Syncfusion.EJ2.MVC5You can find the list of Syncfusion® ASP.NET MVC (EJ2) NuGet packages published on nuget.org from here.
Install the specified Syncfusion® ASP.NET MVC (EJ2) NuGet package in a specified ASP.NET MVC application
The command below installs the Syncfusion® ASP.NET MVC (EJ2) NuGet package in the given ASP.NET MVC application:
Install-Package <PackageName> -ProjectName <ProjectName>For example:
Install-Package Syncfusion.EJ2.MVC5 -ProjectName SyncfusionMVCWebApplication -
By default, the package will be installed with the latest version. You can specify the required version with the
-Versionflag to install the Syncfusion® ASP.NET MVC (EJ2) NuGet packages at the appropriate version:Install-Package Syncfusion.EJ2.MVC5 -Version 19.2.0.57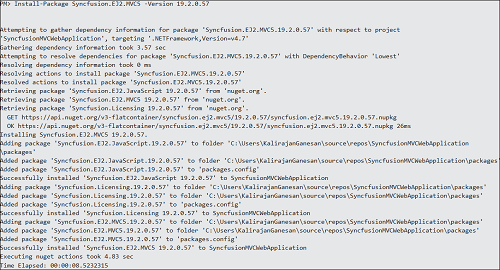
-
The NuGet package manager console will install the Syncfusion® ASP.NET MVC (EJ2) NuGet package and its dependencies. When the installation is complete, the console will show that your Syncfusion® ASP.NET MVC (EJ2) package has been successfully added to the application.
-
At this point, your application has all the required Syncfusion® assemblies, and you will be ready to start building high-performance, responsive apps with Syncfusion® ASP.NET MVC (EJ2) components. Also, you can refer to the ASP.NET MVC (EJ2) help documentation for development.
Next Steps
After installing the NuGet package, you typically need to:
-
Register the Syncfusion® resources. In your ASP.NET MVC application, open
~/App_Start/BundleConfig.cs(or equivalent) and add the Syncfusion® theme stylesheet and script bundles for the components you plan to use. For example:bundles.Add(new StyleBundle("~/Content/syncfusion").Include( "~/Content/ej2/bootstrap4.css")); bundles.Add(new ScriptBundle("~/Scripts/syncfusion").Include( "~/Scripts/ej2/ej2.min.js")); -
Reference the bundles from the relevant Razor view (for example,
_Layout.cshtml):@Styles.Render("~/Content/syncfusion") @Scripts.Render("~/Scripts/syncfusion") -
For an individual component (e.g., Grid), register it in
BundleConfig.csand use the Tag Helper in your view:<ejs-grid id="Grid" allowPaging="true"> <e-data-manager url="/Home/UrlDatasource" adaptor="UrlAdaptor"></e-data-manager> <e-grid-columns> <e-grid-column field="OrderID" headerText="Order ID" textAlign="Right" width="120"></e-grid-column> <e-grid-column field="CustomerID" headerText="Customer ID" width="140"></e-grid-column> </e-grid-columns> </ejs-grid>
For component-specific configuration, theming, and usage examples, refer to the documentation of the individual Syncfusion® ASP.NET MVC (EJ2) component you are using.
Troubleshooting
| Issue | Possible Cause | Suggested Fix |
|---|---|---|
Install-Package fails with “Package not found”. |
The package source in Visual Studio is not set to nuget.org. | In Tools → NuGet Package Manager → Package Manager Settings, add https://api.nuget.org/v3/index.json as a package source. |
The Syncfusion.EJ2.MVC5 package reports a target-framework error. |
The selected package version does not support your project’s target framework. | Use a package version that supports your .NET Framework version (for example, 19.x for .NET Framework 4.5.2+). |
| Syncfusion controls do not render in the view. | The Syncfusion resources (CSS / JS) are not referenced from the layout. | Reference the Syncfusion stylesheet and script bundles from _Layout.cshtml. See the Next Steps section. |
| License warning appears after build. | License key has not been registered for this project. | Generate the license key from the License & Downloads page and register it. See Common Installation Errors. |
For additional help, see Common Installation Errors.