How can I help you?
Getting Started with Essential® JS 2 for ASP.NET MVC in Visual Studio
9 Dec 202415 minutes to read
This article provides a step-by-step introduction to configure Essential® JS 2 setup, build and publish a simple ASP.NET MVC web application using Visual Studio.
NOTE
Starting with v16.2.0.x, if you reference to Syncfusion® assemblies from trial setup or NuGet feed, you should include a license key in your projects. Refer to this link to learn about registering Syncfusion® license key in your ASP.NET MVC application to use the components.
Using Visual Studio 2019
Getting Started with ASP.NET MVC 5 Web Application
Prerequisites
To get started with ASP.NET MVC 5 application, ensure the following software to be installed on the machine.
- .Net Framework 4.5 and above.
- ASP.NET MVC 5
- Visual Studio 2019
Create ASP.NET MVC web application
-
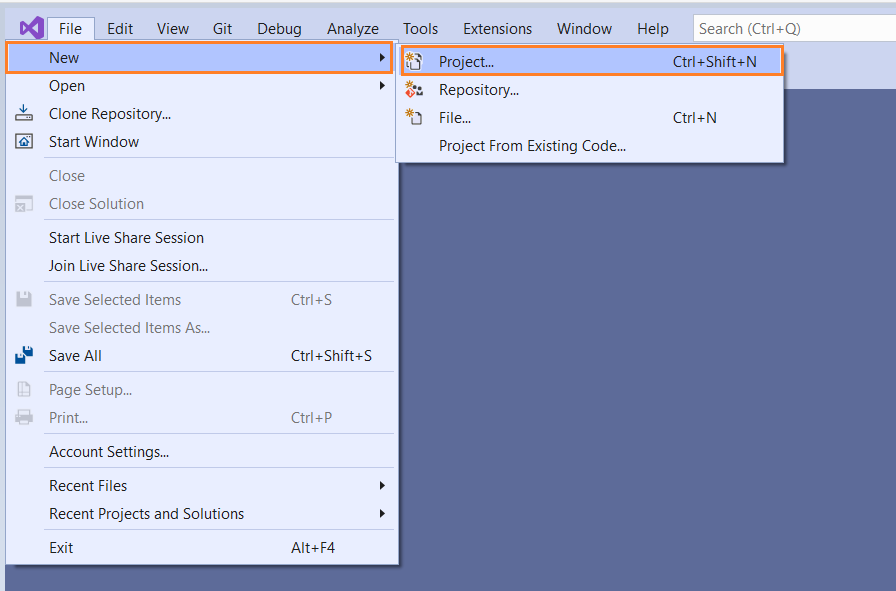
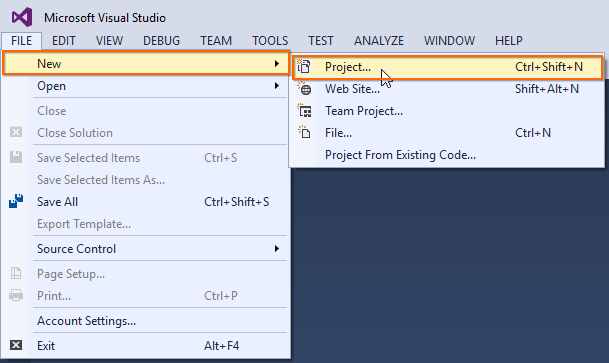
Choose File > New > Project… in the Visual Studio menu bar.
-
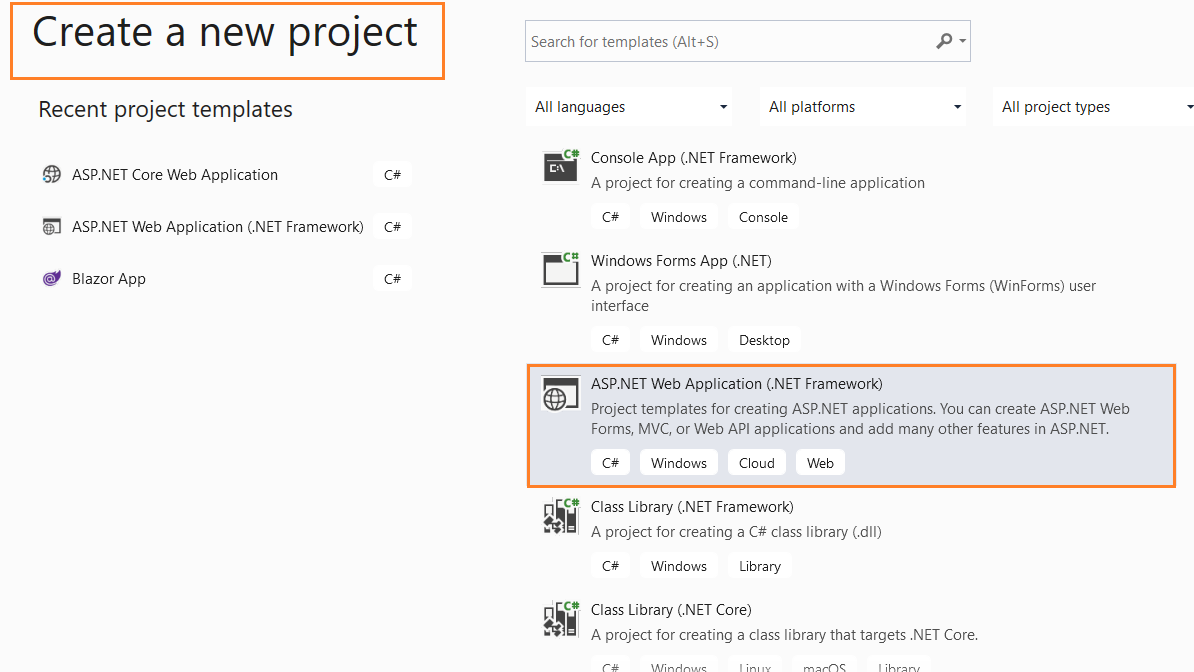
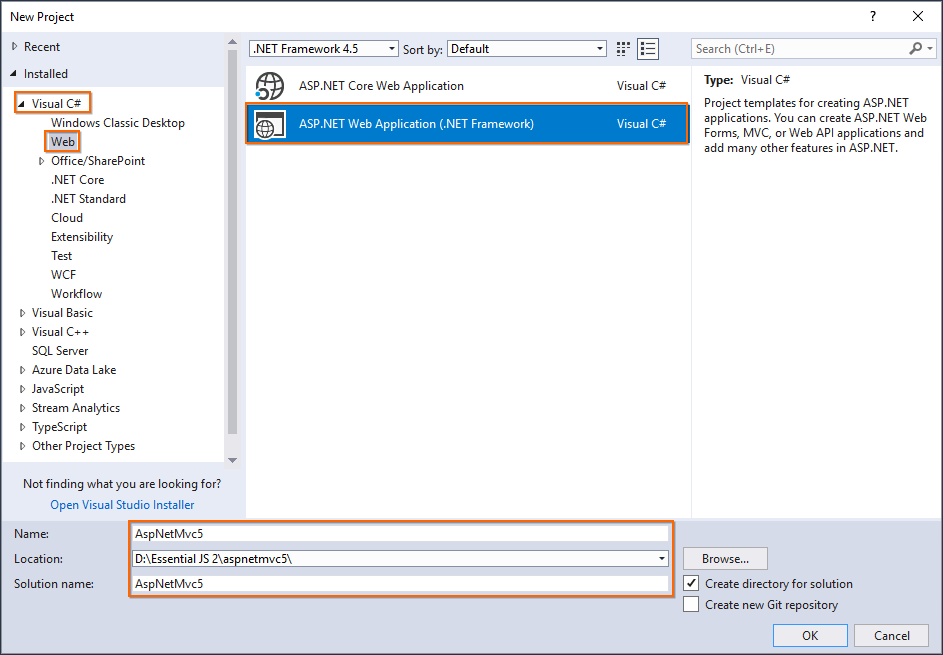
Select ASP.NET Web Application (.NET Framework) in visual studio 2019.
-
Change the application name, and then click Create.
NOTE
The Essential® JS 2 supports 4.5+ .NET Framework in the ASP.NET MVC application. i.e. The minimum target framework is 4.5 for Syncfusion® ASP.NET MVC (Essential® JS 2).

-
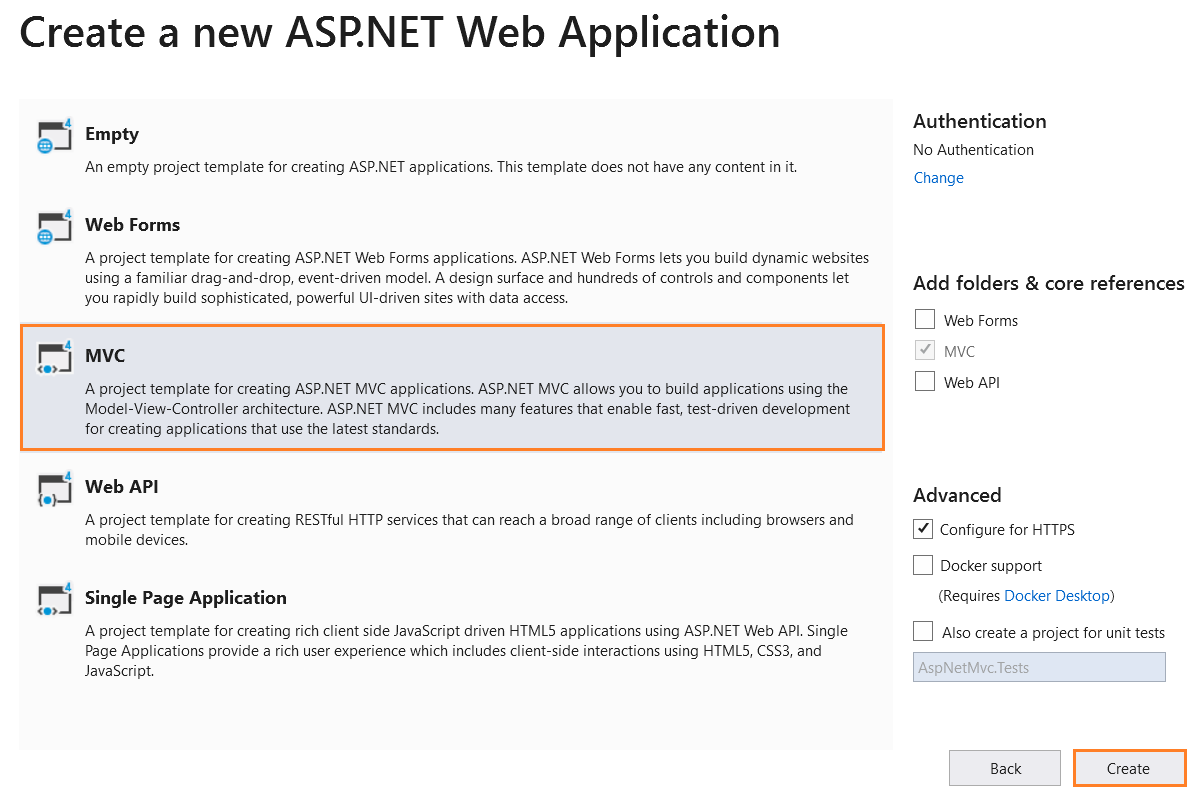
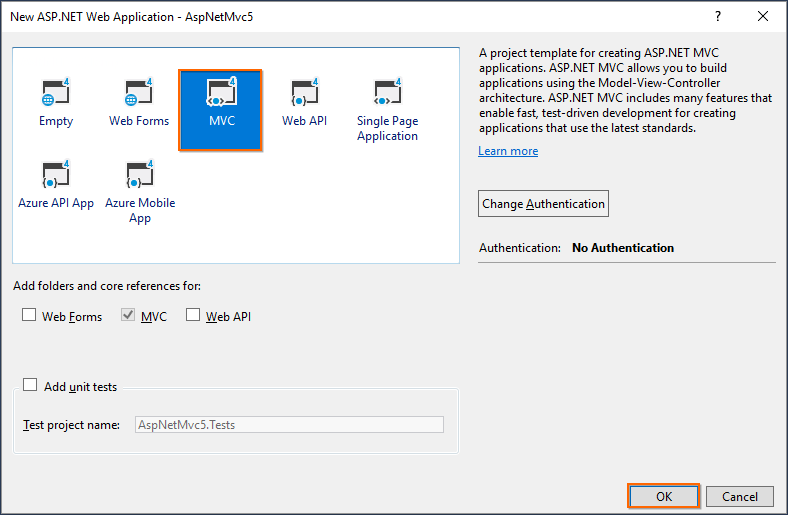
Choose MVC and then click Create. Now, the MVC web application project is created with default ASP.NET MVC template.
Configure Essential® JS 2 in the application
-
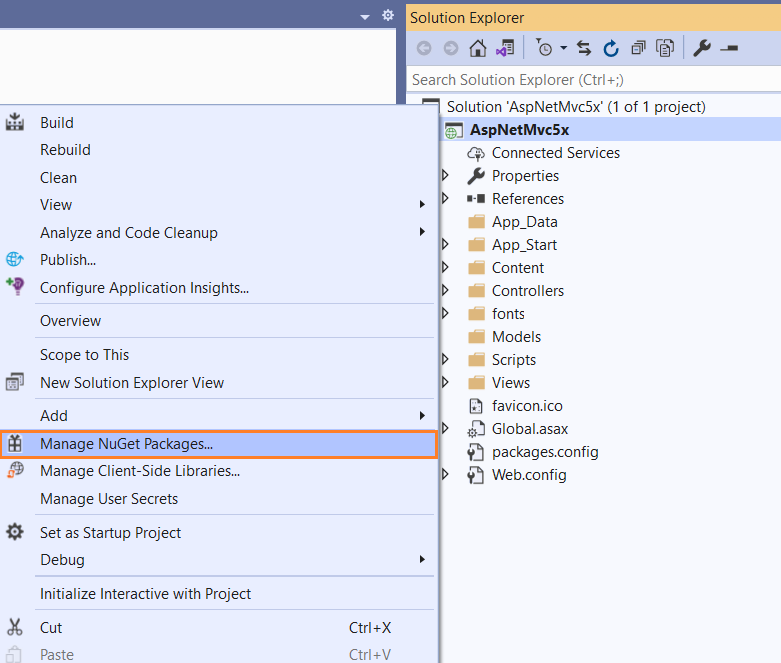
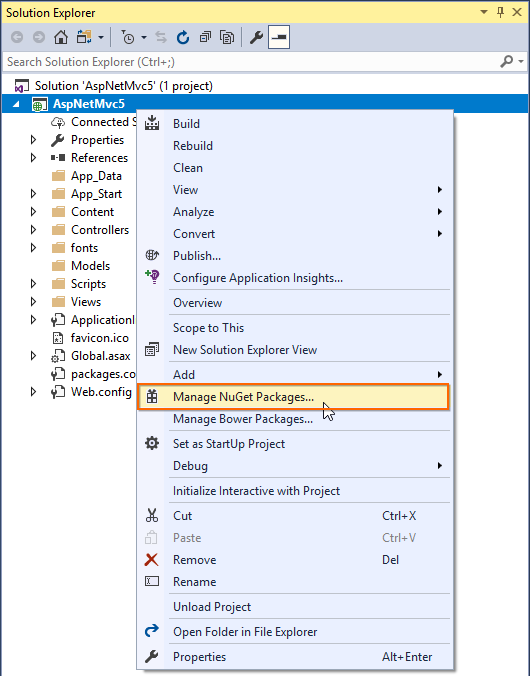
Add the
Syncfusion.EJ2.MVC5NuGet package to the new application by using the Nuget Package Manager. Right-click the project and select Manage NuGet Packages….NOTE
Refer to this article to learn more details about installing Essential® JS 2 NuGet packages in various OS environment.
-
Search the
Syncfusion EJ2 MVC5keyword in the Browse tab and install Syncfusion.EJ2.MVC5 NuGet package in the application.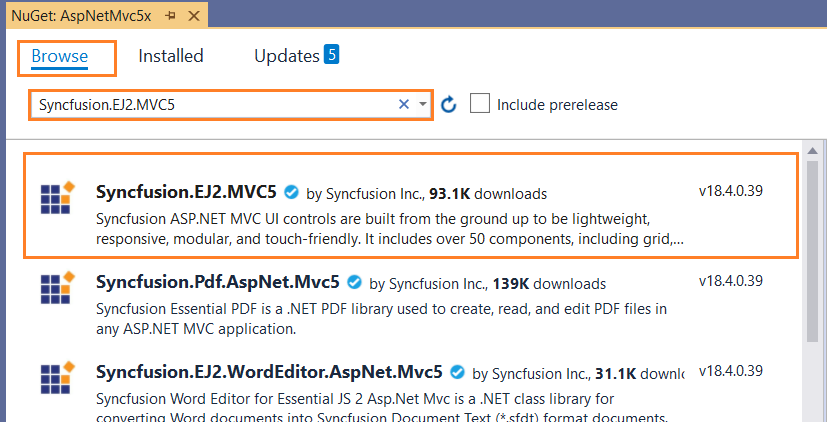
The Essential® JS 2 MVC5 NuGet package will be included in the project, after the installation process is completed.
NOTE
The Syncfusion.EJ2.MVC5 NuGet package has dependencies,
Newtonsoft.Jsonfor JSON serialization andSyncfusion.Licensingfor validating Syncfusion® license key. -
Open
~/Views/Web.configfile and add theSyncfusion.EJ2namesapce reference to the<system.web.webPages.razor>element andSyncfusion.EJ2assembly reference to<system.web>element.<configuration> ... <system.web.webPages.razor> ... ... <pages pageBaseType="System.Web.Mvc.WebViewPage"> <namespaces> ... ... <add namespace="Syncfusion.EJ2"/> </namespaces> </pages> </system.web.webPages.razor> ... <system.web> <compilation> <assemblies> ... ... <add assembly="Syncfusion.EJ2, Culture=neutral" /> </assemblies> </compilation> </system.web> </configuration> -
Add the client-side resources through CDN in the
<head>element of~/Views/Shared/_Layout.cshtmllayout page.<head> ... <!-- Syncfusion Essential JS 2 Styles --> <link rel="stylesheet" href="https://cdn.syncfusion.com/ej2/material.css" /> <!-- Syncfusion Essential JS 2 Scripts --> <script src="https://cdn.syncfusion.com/ej2/dist/ej2.min.js"></script> </head> -
Add the Essential® JS 2 Script Manager at the end of
<body>element in the~/Views/Shared/_Layout.cshtmllayout page.<body> ... <!-- Syncfusion Essential JS 2 ScriptManager --> @Html.EJS().ScriptManager() </body> -
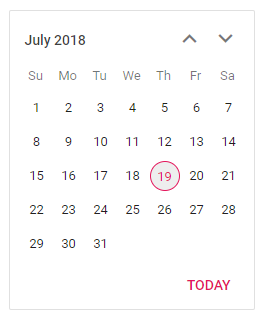
Add the Syncfusion® Essential® JS 2 components in any web page (
cshtml) in the~/Viewsfolder.For example, the calendar component is added to the
~/Views/Home/Index.cshtmlpage.<div> @Html.EJS().Calendar("calendar").Render() </div> -
Run the application and the Essential® JS 2 calendar component will render in the web browser.
Using Visual Studio 2017
Getting Started with ASP.NET MVC 5
Prerequisites
To get started with ASP.NET MVC 5 application, ensure the following software to be installed on the machine.
- .Net Framework 4.5 and above.
- ASP.NET MVC 5
- Visual Studio 2017
Create ASP.NET MVC 5 web application
-
Choose File > New > Project… in the Visual Studio menu bar.
-
Select Installed > Visual C# > Web and choose the required .NET Framework in the drop-down.
-
Select ASP.NET Web Application (.NET Framework) and change the application name, and then click OK.
NOTE
The Essential® JS 2 supports 4.5+ .NET Framework in the ASP.NET MVC application. i.e. The minimum target framework is 4.5 for Syncfusion® ASP.NET MVC (Essential® JS 2).
-
Choose MVC and then click OK. Now, the MVC web application project is created with default ASP.NET MVC template.
Configure Essential® JS 2 in the application
-
Add the
Syncfusion.EJ2.MVC5NuGet package to the new application by using the Nuget Package Manager. Right-click the project and select Manage NuGet Packages….NOTE
Refer to this article to learn more details about installing Essential® JS 2 NuGet packages in various OS environment.
-
Search the
Syncfusion EJ2 MVC5keyword in the Browse tab and install Syncfusion.EJ2.MVC5 NuGet package in the application.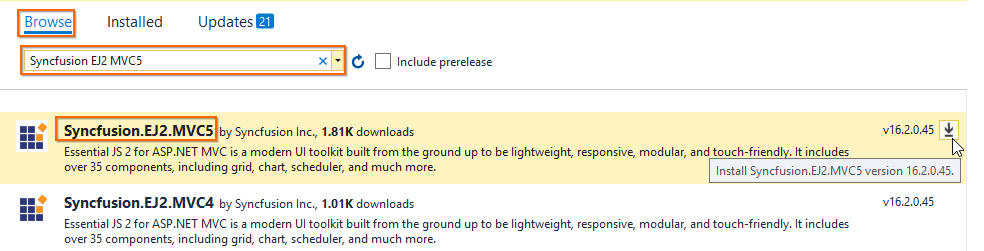
The Essential® JS 2 MVC5 NuGet package will be included in the project, after the installation process is completed.
NOTE
The Syncfusion.EJ2.MVC5 NuGet package has dependencies,
Newtonsoft.Jsonfor JSON serialization andSyncfusion.Licensingfor validating Syncfusion® license key. -
Open
~/Views/Web.configfile and add theSyncfusion.EJ2namesapce reference to the<system.web.webPages.razor>element andSyncfusion.EJ2assembly reference to<system.web>element.<configuration> ... <system.web.webPages.razor> ... ... <pages pageBaseType="System.Web.Mvc.WebViewPage"> <namespaces> ... ... <add namespace="Syncfusion.EJ2"/> </namespaces> </pages> </system.web.webPages.razor> ... <system.web> <compilation> <assemblies> ... ... <add assembly="Syncfusion.EJ2, Culture=neutral" /> </assemblies> </compilation> </system.web> </configuration> -
Add the client-side resources through CDN in the
<head>element of~/Views/Shared/_Layout.cshtmllayout page.<head> ... <!-- Syncfusion Essential JS 2 Styles --> <link rel="stylesheet" href="https://cdn.syncfusion.com/ej2/material.css" /> <!-- Syncfusion Essential JS 2 Scripts --> <script src="https://cdn.syncfusion.com/ej2/dist/ej2.min.js"></script> </head> -
Add the Essential® JS 2 Script Manager at the end of
<body>element in the~/Views/Shared/_Layout.cshtmllayout page.<body> ... <!-- Syncfusion Essential JS 2 ScriptManager --> @Html.EJS().ScriptManager() </body> -
Add the Syncfusion® Essential® JS 2 components in any web page (
cshtml) in the~/Viewsfolder.For example, the calendar component is added to the
~/Views/Home/Index.cshtmlpage.<div> @Html.EJS().Calendar("calendar").Render() </div> -
Run the application and the Essential® JS 2 calendar component will render in the web browser.
Getting Started with ASP.NET MVC 4
Prerequisites
To get started with ASP.NET MVC 4 application, ensure the following software to be installed on the machine.
- .Net Framework 4.5 and above.
- ASP.NET MVC 4
- Visual Studio 2013
Create ASP.NET MVC 4 web application
-
Choose File > New > Project… in the Visual Studio menu bar.
-
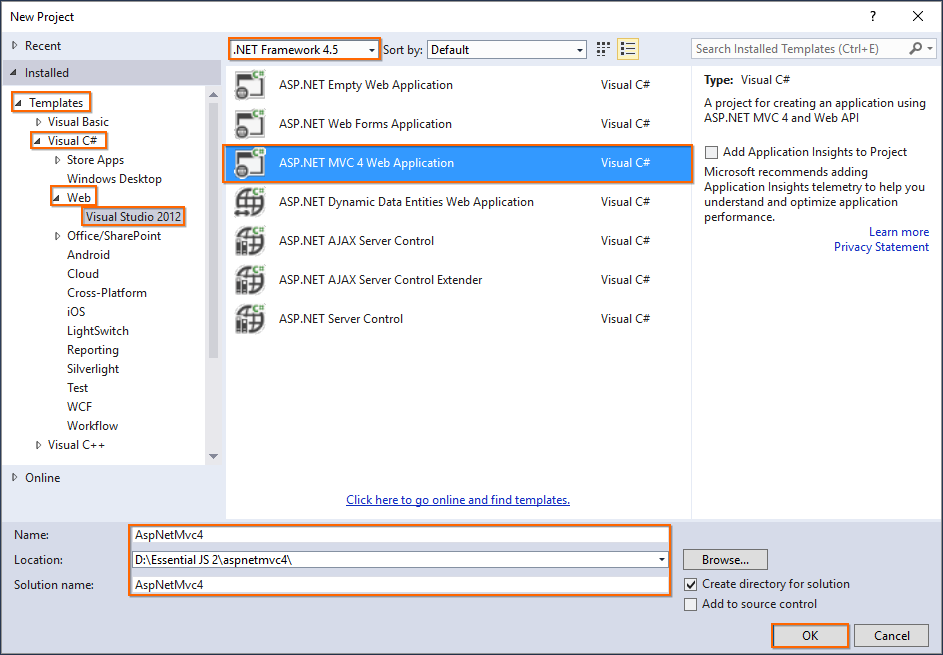
Select Installed > Templates > Visual C# > Web > Visual Studio 2012 and choose the required .NET Framework in the drop-down.
-
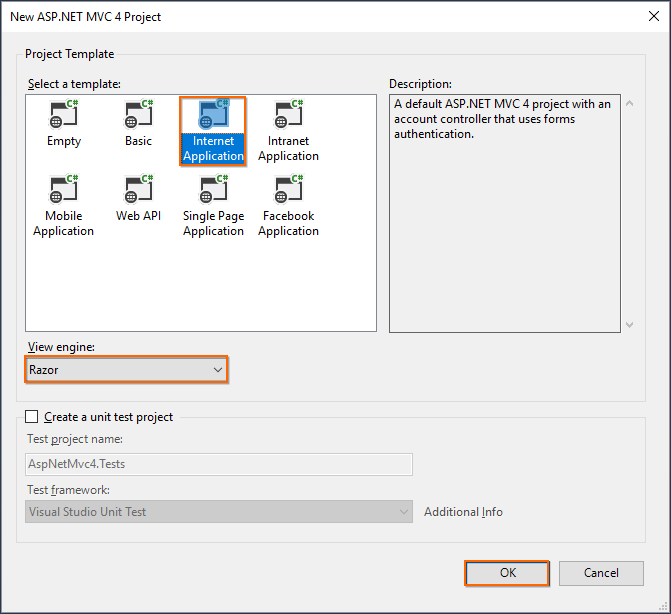
Select ASP.NET MVC 4 Web Application and change the application name and click OK.
NOTE
The Essential® JS 2 supports 4.5+ .NET Framework in the ASP.NET MVC application. i.e. The minimum target framework is 4.5 for Syncfusion® ASP.NET MVC (Essential® JS 2).
-
Choose Internet Application and select View engine as Razor, and then click OK. Now, the MVC web application project is created with default ASP.NET MVC 4 template.
Configure Essential® JS 2 in the application
-
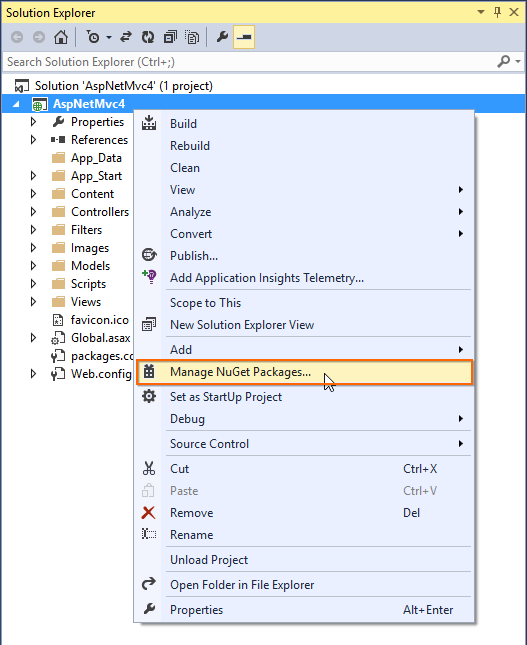
Add the
Syncfusion.EJ2.MVC4NuGet package into the new application by using the Nuget Package Manager. Right-click the project and select Manage NuGet Packages….NOTE
Refer to this article to learn more details about installing Essential® JS 2 NuGet packages in various OS environment.
-
Select Online option and search the keyword
Syncfusion EJ2 MVC4in the search text box, and then install Syncfusion.EJ2.MVC4 NuGet package in the application.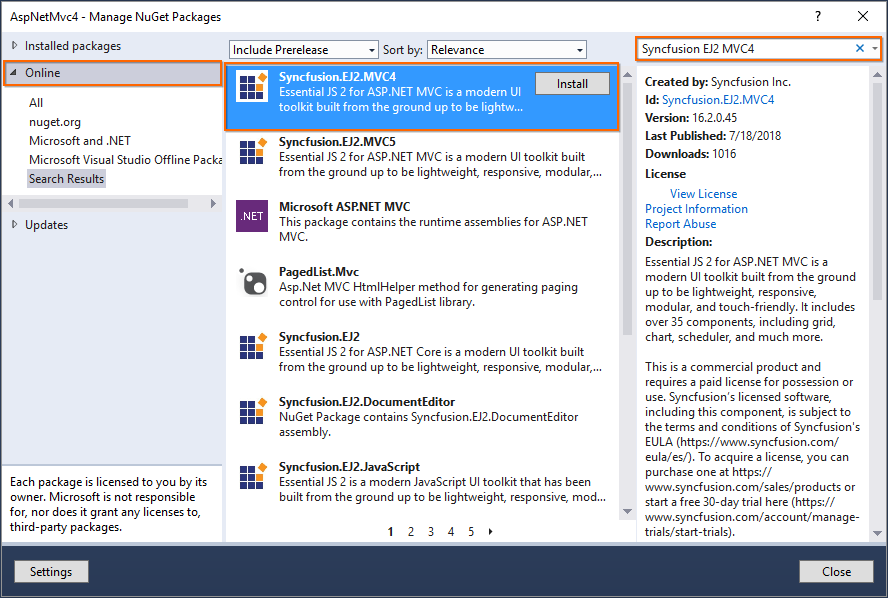
The Essential® JS 2 MVC4 NuGet package will be included in the project, after the installation process is completed.
NOTE
The Syncfusion.EJ2.MVC4 NuGet package has dependencies,
Newtonsoft.Jsonfor JSON serialization andSyncfusion.Licensingfor validating Syncfusion® license key. -
Open
~/Views/Web.configfile and add theSyncfusion.EJ2namesapce reference to the<system.web.webPages.razor>element, and then addSyncfusion.EJ2assembly reference to the<system.web>element.<configuration> ... <system.web.webPages.razor> ... ... <pages pageBaseType="System.Web.Mvc.WebViewPage"> <namespaces> ... ... <add namespace="Syncfusion.EJ2"/> </namespaces> </pages> </system.web.webPages.razor> ... <system.web> ... ... <pages> <controls> ... ... <add assembly="Syncfusion.EJ2, Culture=neutral" tagPrefix="mvc"/> </controls> </pages> </system.web> </configuration> -
Add the client-side resources through CDN in the
<head>element of~/Views/Shared/_Layout.cshtmllayout page.<head> ... <!-- Syncfusion Essential JS 2 Styles --> <link rel="stylesheet" href="https://cdn.syncfusion.com/ej2/material.css" /> <!-- Syncfusion Essential JS 2 Scripts --> <script src="https://cdn.syncfusion.com/ej2/dist/ej2.min.js"></script> </head> -
Add the Essential® JS 2 Script Manager at the end of
<body>element in the~/Views/Shared/_Layout.cshtmllayout page.<body> ... <!-- Syncfusion Essential JS 2 ScriptManager --> @Html.EJS().ScriptManager() </body> -
Add the Syncfusion® Essential® JS 2 components in any web page (
cshtml) in the~/Viewsfolder.For example, the calendar component is added to the
~/Views/Home/Index.cshtmlpage.<div> @Html.EJS().Calendar("calendar").Render() </div> -
Run the application and the Essential® JS 2 Calendar component will render in the web browser.