File source in Uploader Control
21 Dec 202215 minutes to read
Paste to upload
The uploader component allows you to upload the files using the select or drop files option from the file explorer. It also supports pasting to upload the image files. You can upload any currently copied images in the clipboard.
NOTE
When you paste the image, it will be saved in the server with the filename as
image.png. The file name can be renamed in the server end. You can generate a random name for the file name usinggetUniqueIDmethod.
Refer to the following example.
@{
    var asyncSettings = new Syncfusion.EJ2.Inputs.UploaderAsyncSettings { SaveUrl = "https://services.syncfusion.com/aspnet/production/api/FileUploader/Save", RemoveUrl = "https://services.syncfusion.com/aspnet/production/api/FileUploader/Remove" };
}

<ejs-uploader id="uploadFiles" asyncSettings="@asyncSettings" directoryUpload="true" autoUpload="false" uploading="onUploadBegin"></ejs-uploader>

<script>
    function onUploadBegin(args) {
        // check whether the file is uploading from paste.
        if (args.fileData.fileSource === 'paste') {
            let newName = ej.base.getUniqueID(args.fileData.name.substring(0, args.fileData.name.lastIndexOf('.'))) + '.png';

            args.customFormData = [{ 'fileName': newName }];
        }
    }
</script>
using System;
using System.Collections.Generic;
using System.Linq;
using System.Threading.Tasks;
using Microsoft.AspNetCore.Mvc;
namespace EJ2CoreSampleBrowser.Controllers.Uploader
{
public partial class UploaderController : Controller
{
public ActionResult DefaultFunctionalities()
{
return View();
}
}
}Server-side configuration for save the paste file
[AcceptVerbs("Post")]

private IHostingEnvironment hostingEnv;
public DefaultController(IHostingEnvironment env)
    {
        this.hostingEnv = env;
    }
public void Save(IList<IFormFile> UploadFiles)
    {
    try
        {
        foreach (var file in UploadFiles)
            {
                var filename = ContentDispositionHeaderValue
                                    .Parse(file.ContentDisposition)
                                    .FileName
                                    .Trim('"');
                filename =  hostingEnv.WebRootPath + $@"\{filename}";
                long size = 0;
                size += file.Length;
                if (!System.IO.File.Exists(filename))
                {
                using (FileStream fs = System.IO.File.Create(filename))
                    {
                        file.CopyTo(fs);
                        fs.Flush();
                    }
                }
            }
        }
        catch (Exception e)
        {
            Response.Clear();
            Response.StatusCode = 204;
            Response.HttpContext.Features.Get<IHttpResponseFeature>().ReasonPhrase = "File failed to upload";
            Response.HttpContext.Features.Get<IHttpResponseFeature>().ReasonPhrase = e.Message;
        }
    }
Directory upload
The uploader component allows you to upload all files in the folders to server by using the directoryUpload property.
When this property is enabled, the uploader component processes the files by iterating through the files and sub-directories in a directory. It allows you to select only folders instead of files to upload.
NOTE
The directory upload is available only in browsers that supports HTML5 directory. The uploader will process directory upload by dragging and dropping in the Edge browser.
Refer to the following example to upload files to the server.
@{
    var asyncSettings = new Syncfusion.EJ2.Inputs.UploaderAsyncSettings { SaveUrl = "https://services.syncfusion.com/aspnet/production/api/FileUploader/Save", RemoveUrl = "https://services.syncfusion.com/aspnet/production/api/FileUploader/Remove" };
}
<ejs-uploader id="uploadFiles" asyncSettings="@asyncSettings" directoryUpload="true" autoUpload="false"></ejs-uploader>
using System;
using System.Collections.Generic;
using System.Linq;
using System.Threading.Tasks;
using Microsoft.AspNetCore.Mvc;
namespace EJ2CoreSampleBrowser.Controllers.Uploader
{
public partial class UploaderController : Controller
{
public ActionResult DefaultFunctionalities()
{
return View();
}
}
}Server-side configuration for save the files of folders
[AcceptVerbs("Post")]

private IHostingEnvironment hostingEnv;
public DefaultController(IHostingEnvironment env)
    {
        this.hostingEnv = env;
    }
    public void Save(IList<IFormFile> chunkFile, IList<IFormFile> UploadFiles)
    {
        long size = 0;
        try
        {
            foreach (var file in UploadFiles)
            {
                var filename = ContentDispositionHeaderValue
                    .Parse(file.ContentDisposition)
                    .FileName
                    .Trim('"');
                var folders = filename.Split('/');
                var uploaderFilePath = hostingEnv.WebRootPath;
                    // for Directory upload
                if (folders.Length > 1)
                {
                    for (var i = 0; i < folders.Length - 1; i++)
                    {
                        var newFolder = uploaderFilePath + $@"\{folders[i]}";
                        Directory.CreateDirectory(newFolder);
                        uploaderFilePath = newFolder;
                        filename = folders[i + 1];
                    }
                }
                filename = uploaderFilePath + $@"\{filename}";
                size += file.Length;
                if (!System.IO.File.Exists(filename))
                {
                    using (FileStream fs = System.IO.File.Create(filename))
                    {
                        file.CopyTo(fs);
                        fs.Flush();
                    }

                }
            }
        }
        catch (Exception e)
        {
            Response.Clear();
            Response.StatusCode = 204;
            Response.HttpContext.Features.Get<IHttpResponseFeature>().ReasonPhrase = "File failed to upload";
            Response.HttpContext.Features.Get<IHttpResponseFeature>().ReasonPhrase = e.Message;
        }
    }
Drag and drop
The uploader component allows you to drag and drop the files to upload. You can drag the files from file explorer and drop into the drop area.
By default, the uploader component act as drop area element. The drop area gets highlighted when you drag the files over drop area.
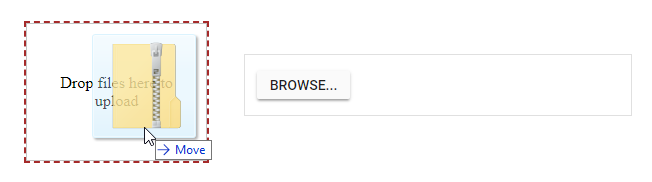
Custom drop area
The uploader component allows you to set external target element as drop area using the dropArea property. The element can be represented as HTML element or element’s id.
<div id="droparea">
    Drop files here to upload
</div>
<div id="uploadfile">
    <ejs-uploader id="uploadFiles" dropArea="#droparea" autoUpload="false"></ejs-uploader>
</div>#droparea {
padding: 50px 25px;
margin: 30px auto;
border: 1px solid #c3c3c3;
text-align: center;
width: 20%;
display: inline-flex;
}
.e-file-select,
.e-file-drop {
display: none;
}
body .e-upload-drag-hover {
outline: 2px dashed brown;
}
#uploadfile {
width: 60%;
display: inline-flex;
margin-left: 5%;
}Output be like the below.
Customize drop area
You can customize the appearance of drop area by overriding the default drop area styles. The class “” and “” is available to handle this customization.
@{
    var asyncSettings = new Syncfusion.EJ2.Inputs.UploaderAsyncSettings { SaveUrl = "https://services.syncfusion.com/aspnet/production/api/FileUploader/Save", RemoveUrl = "https://services.syncfusion.com/aspnet/production/api/FileUploader/Remove" };
}
<div id="dropArea">
    <span id="drop" class="droparea">Drop files here or<a id="browse" onclick="browseClick()"><u>Browse</u></a> </span>
    <ejs-uploader id="UploadFiles" dropArea="#dropTarget" asyncSettings="@asyncSettings">
    </ejs-uploader>
</div>
<script>
   function browseClick() {
      document.getElementsByClassName('e-file-select-wrap')[0].querySelector('button').click(); return false;
   }
</script>
<style>
.e-file-select-wrap {
   display: none;
}

#dropArea .e-upload {
   border: 0;
   margin-top: 15px;
}

#drop {
   padding-left: 30%;
}

#dropArea {
   min-height: 18px;
   border: 1px dashed #c3c3cc;
   padding-top: 15px;
   margin: 20px auto;
   width: 400px;
}
</style>
using System;
using System.Collections.Generic;
using System.Linq;
using System.Threading.Tasks;
using Microsoft.AspNetCore.Mvc;
namespace EJ2CoreSampleBrowser.Controllers.TextBoxes
{
public partial class UploaderController : Controller
{
public ActionResult DefaultFunctionalities()
{
return View();
}
}
}Output be like the below.

NOTE
You can also explore ASP.NET Core File Upload feature tour page for its groundbreaking features. You can also explore our ASP.NET Core File Upload example to understand how to browse the files which you want to upload to the server.