Chunk upload in ASP.NET CORE Uploader control
6 Dec 202413 minutes to read
The Uploader sends the large file split into small chunks and transmits to the server using AJAX. You can also pause, resume, and retry the failed chunk file.
NOTE
- The chunk upload works in asynchronous upload only.
- This feature is available from the Essential Studio® Vol 2, 2018 release.
To enable the chunk upload, set the size to chunkSize option of the upload and it receives the value in bytes.
@{
    var asyncSettings = new Syncfusion.EJ2.Inputs.UploaderAsyncSettings { SaveUrl = "https://services.syncfusion.com/aspnet/production/api/FileUploader/Save", RemoveUrl = "https://services.syncfusion.com/aspnet/production/api/FileUploader/Remove", ChunkSize = 102400 };
}
<ejs-uploader id="uploadFiles" asyncSettings="@asyncSettings" autoUpload="false"></ejs-uploader>
using System;
using System.Collections.Generic;
using System.Linq;
using System.Threading.Tasks;
using Microsoft.AspNetCore.Mvc;
namespace EJ2CoreSampleBrowser.Controllers.TextBoxes
{
public partial class UploaderController : Controller
{
public ActionResult DefaultFunctionalities()
{
return View();
}
}
}Output be like the below.
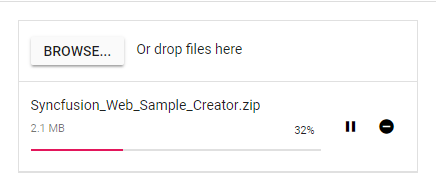
The chunk upload functionality separates the selected files into blobs of the data or chunks. These chunks are transmitted to the server using an AJAX request.
The chunks are sent in sequential order, and the next chunk can be sent to the server according to the success of the previous chunk. If any one of the chunk failed, then the remaining chunk cannot be sent to the server.
The chunkSuccess or chunkFailure event will be triggered when the chunk is sent to the server successfully or failed. If all the chunks are sent to the server successfully, the uploader success event is triggered.
NOTE
Chunk upload will work when the selected file size is greater than the specified chunk size. otherwise, it upload the files normally.
Additional configurations
To modify the chunk upload, the following options can be used.
-
RetryAfterDelay - If error occurs while sending any chunk request from JavaScript, hold the operation for 500 milliseconds (by default), and retry the operation using chunk. This can be achieved by using the asyncSettings.retryAfterDelay property. You can modify the holding time interval in milliseconds.
-
RetryCount - Specifies the number of retry actions performed when the file fails to upload. By default, retry action is performed 3 times. If the file fails to upload continuously, the request is aborted and the uploader failure event will trigger.
The following sample specifies the chunk upload delay with 3000 milliseconds and the retry count is 5. The failure event is triggered as the wrong saveUrl is used.
@{
    var asyncSettings = new Syncfusion.EJ2.Inputs.UploaderAsyncSettings { SaveUrl = "https://services.syncfusion.com/aspnet/production/api/FileUploader/Save", RemoveUrl = "https://services.syncfusion.com/aspnet/production/api/FileUploader/Remove", ChunkSize = 102400, RetryCount = 5, RetryAfterDelay = 3000 };
}
<ejs-uploader id="uploadFiles" asyncSettings="@asyncSettings" autoUpload="false"></ejs-uploader>
using System;
using System.Collections.Generic;
using System.Linq;
using System.Threading.Tasks;
using Microsoft.AspNetCore.Mvc;
namespace EJ2CoreSampleBrowser.Controllers.TextBoxes
{
public partial class UploaderController : Controller
{
public ActionResult DefaultFunctionalities()
{
return View();
}
}
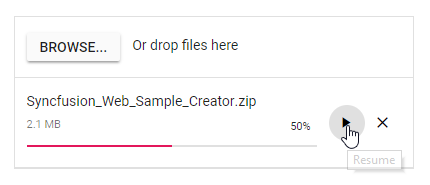
}Resumable upload
Allows you to resume an upload operation after a network failure or manually interrupts (pause) the upload. You can perform pause and resume upload actions using public methods (pause and resume) and UI interaction. The pause icon is enabled after the upload begins.
NOTE
This pause and resume features available only when the chunk upload is enabled.
@{
    var asyncSettings = new Syncfusion.EJ2.Inputs.UploaderAsyncSettings { SaveUrl = "https://services.syncfusion.com/aspnet/production/api/FileUploader/Save", RemoveUrl = "https://services.syncfusion.com/aspnet/production/api/FileUploader/Remove", ChunkSize = 102400 };
}
<ejs-uploader id="uploadFiles" asyncSettings="@asyncSettings" autoUpload="false"></ejs-uploader>
using System;
using System.Collections.Generic;
using System.Linq;
using System.Threading.Tasks;
using Microsoft.AspNetCore.Mvc;
namespace EJ2CoreSampleBrowser.Controllers.TextBoxes
{
public partial class UploaderController : Controller
{
public ActionResult DefaultFunctionalities()
{
return View();
}
}
}Output be like the below.
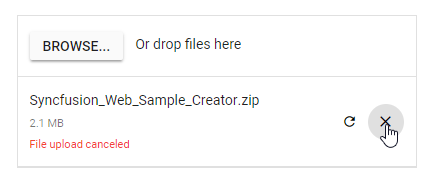
Cancel upload
The uploader control allows you to cancel the uploading file. This can be achieved by clicking the cancel icon or using the cancel method. The canceling event will be fired whenever the file upload request is canceled. While canceling the upload request, the partially uploaded file is removed from the server.
When the request fails, the pause icon is changed to retry icon. By clicking the retry icon, sends the failed chunk request again to the server and upload started from where it is failed. You can retry the canceled upload request again using retry UI or retry methods. But, if you retry this, the file upload action again starts from initial.
The following example explains about chunk upload with cancel support.
@{
    var asyncSettings = new Syncfusion.EJ2.Inputs.UploaderAsyncSettings { SaveUrl = "https://services.syncfusion.com/aspnet/production/api/FileUploader/Save", RemoveUrl = "https://services.syncfusion.com/aspnet/production/api/FileUploader/Remove", ChunkSize = 102400 };
}
<ejs-uploader id="uploadFiles" asyncSettings="@asyncSettings" autoUpload="false"></ejs-uploader>
using System;
using System.Collections.Generic;
using System.Linq;
using System.Threading.Tasks;
using Microsoft.AspNetCore.Mvc;
namespace EJ2CoreSampleBrowser.Controllers.TextBoxes
{
public partial class UploaderController : Controller
{
public ActionResult DefaultFunctionalities()
{
return View();
}
}
}Output be like the below.
NOTE
The retry action has different working behavior for chunk upload and default upload.
- Chunk upload - Retries to upload the failed request where it is failed previously.
- Default upload - Retries to upload the failed file again from initial.
Server-Side configurations
The server-side implementation entirely depends on the application requirements and logic. The following code snippet provides the server-side logic to handle the chunk upload using the uploader controls.
The
chunk-indexandtotal-chunkvalues are accessible through the form data usingRequest.Form, which retrieves these details from the incoming request.
chunk-index- Indicates the index of the current chunk being received.total-chunk- Represents the total number of chunks for the file being uploaded.
public string uploads = Path.Combine(Directory.GetCurrentDirectory(), "Uploaded Files"); // Set your desired upload directory path

public async Task<IActionResult> Save(IFormFile UploadFiles)
{
    try
    {
        if (UploadFiles.Length > 0)
        {
            var fileName = UploadFiles.FileName;

            // Create upload directory if it doesn't exist
            if (!Directory.Exists(uploads))
            {
                Directory.CreateDirectory(uploads);
            }

            if (UploadFiles.ContentType == "application/octet-stream") //Handle chunk upload
            {
                // Fetch chunk-index and total-chunk from form data
                var chunkIndex = Request.Form["chunk-index"];
                var totalChunk = Request.Form["total-chunk"];

                // Path to save the chunk files with .part extension
                var tempFilePath = Path.Combine(uploads, fileName + ".part");

                using (var fileStream = new FileStream(tempFilePath, chunkIndex == "0" ? FileMode.Create : FileMode.Append))
                {
                    await UploadFiles.CopyToAsync(fileStream);
                }

                // If all chunks are uploaded, move the file to the final destination
                if (Convert.ToInt32(chunkIndex) == Convert.ToInt32(totalChunk) - 1)
                {
                    var finalFilePath = Path.Combine(uploads, fileName);

                    // Move the .part file to the final destination without the .part extension
                    System.IO.File.Move(tempFilePath, finalFilePath);

                    return Ok(new { status = "File uploaded successfully" });
                }

                return Ok(new { status = "Chunk uploaded successfully" });
            }
            else //Handle normal upload
            {
                var filePath = Path.Combine(uploads, fileName);

                using (var fileStream = new FileStream(filePath, FileMode.Create))
                {
                    await UploadFiles.CopyToAsync(fileStream);
                }

                return Ok(new { status = "File uploaded successfully" });
            }
        }

        return BadRequest(new { status = "No file to upload" });
    }
    catch (Exception ex)
    {
        return StatusCode(500, new { status = "Error", message = ex.Message });
    }
}

// Method to handle file removal (optional if needed)
public async Task<IActionResult> Remove(string UploadFiles)
{
    try
    {
        var filePath = Path.Combine(uploads, UploadFiles);

        if (System.IO.File.Exists(filePath))
        {
            System.IO.File.Delete(filePath);
            return Ok(new { status = "File deleted successfully" });
        }
        else
        {
            return NotFound(new { status = "File not found" });
        }
    }
    catch (Exception ex)
    {
        return StatusCode(500, new { status = "Error", message = ex.Message });
    }
}
NOTE
You can also explore ASP.NET Core File Upload feature tour page for its groundbreaking features. You can also explore our ASP.NET Core File Upload example to understand how to browse the files which you want to upload to the server.