Content in Tooltip Control
31 Aug 202310 minutes to read
A text or a piece of information assigned to the Tooltip’s content property will be displayed as the main text stream of the Tooltip. It can be a string or a template content. If the content property is not provided with any specific value, then it takes the value assigned to the title attribute of the target element on which the Tooltip was initialized. The content can also dynamically be assigned to the Tooltip via Fetch.
Template content
Any text or image can be added to the Tooltip, by default. To customize the Tooltip layout or to create your own visualized element on the Tooltip, template can be used.
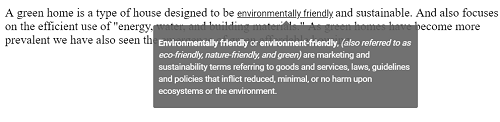
Refer to the following code example to add formatted HTML content to the Tooltip.
<ejs-tooltip id="tooltipContent" target="#target" content="<div><p><strong>Environmentally friendly</strong> or <strong>environment-friendly</strong>, <i>(also referred to as eco-friendly, nature-friendly, and green)</i> are marketing and sustainability terms referring to goods and services, laws, guidelines and policies that inflict reduced, minimal, or no harm upon ecosystems or the environment.</p></div>">
        <e-content-template>
            <div id='container'>
                <p>
                    A green home is a type of house designed to be
                    <a id="target">
                        <u>environmentally friendly</u>
                    </a> and sustainable. And also focuses on the efficient use of "energy, water, and building materials." As green homes
                    have become more prevalent we have also seen the emergence of green affordable housing.
                </p>
            </div>
        </e-content-template>
    </ejs-tooltip>
public ActionResult Template()
{
return View();
}Output be like the below.
Dynamic content via Fetch
The Tooltip content can be dynamically loaded by making use of the Fetch call. The Fetch request is usually made within the beforeRender event of the Tooltip, and then the Tooltip’s content is assigned the value retrieved on it’s success.
NOTE
The Tooltip target property includes a unique identifier used to associate Tooltips with specific elements on a webpage or application interface. When setting the Tooltip target value as a GUID (Globally Unique Identifier), it’s important to note that the GUID must start with a combination of letters before the numeric portion of the GUID. For example, target: ‘#’ + ‘ tooltip’+ ‘96ad88bd-294c-47c3-999b-a9daa3285a05’.
<div id='container'>
        <h4 class="list-header">National Sports</h4>
        <!-- Tooltip element rendering for AjaxContent loading -->
        <ejs-tooltip id="Tooltip" content="Loading..." beforeRender="onBeforeRender" target="#countrylist [title]" showTipPointer="true" position="RightCenter">
            <e-content-template>
                <!-- ListView element -->
                <ejs-listview id="countrylist" dataSource="ViewBag.data" enable="true">
                    <e-listview-fieldsettings text="text" tooltip="id"></e-listview-fieldsettings>
                </ejs-listview>
            </e-content-template>
        </ejs-tooltip>
    </div>


<script>
        /**
         * Process tooltip ajax content.
         */
  function onBeforeRender(args) {
            var _this = this;
            this.content = 'Loading...';
            this.dataBind();
            var fetchApi = new ej.base.Fetch("@Url.Content("~/Scripts/tooltip/tooltipdata.json")", 'GET');
            fetchApi.send().then(function (result) {
            for (var i = 0; i < result.length; i++) {
                if (result[i].Id === args.target.getAttribute('data-content')) {
                    _this.content = "<div class='contentWrap'><span class=" + result[i].Class + "></span><div class='def'>" + result[i].Sports + "</div></div>";
                }
            }
            _this.dataBind();
        }, function (reason) {
            _this.content = reason.message;
            _this.dataBind();
        });
    }
</script>
<link href="~/css/tooltip/icons.css" rel="stylesheet" />
<style>

    .e-bigger [class^="sports-icon-"],
    .e-bigger [class*=" sports-icon-"] {
        font-size: 18px;
    }

    [class^="sports-icon-"],
    [class*=" sports-icon-"] {
        font-family: 'sportsicons';
        speak: none;
        font-size: 16px;
        font-style: normal;
        font-weight: normal;
        font-variant: normal;
        text-transform: none;
        padding-right: 6px;
        vertical-align: middle;
    }

    .sports-icon-cricket:before {
        content: "\e703";
    }

    .sports-icon-archery:before {
        content: "\e705";
    }

    .sports-icon-table-tennis:before {
        content: "\e702";
    }

    .sports-icon-baseball:before {
        content: "\e706";
    }

    .sports-icon-hockey:before {
        content: "\e701";
    }

    .sports-icon-shooting:before {
        content: "\e700";
    }

    .def {
        float: right;
    }

    #countrylist {
        border: 1px solid #dddddd;
        border-radius: 3px;
        max-width: 170px;
        margin: 0 auto;
        overflow: hidden;
    }

    .list-header {
        text-align: center;
        color: rgba(0, 0, 0, 0.54);
    }

    @@media (max-width: 481px) {
        #countrylist {
            margin: 0;
        }

        .list-header {
            text-align: left;
        }
    }
</style>
public ActionResult AjaxContent()
{
List<object> country = new List<object>();
country.Add(new { id = "1", text = "Australia" });
country.Add(new { id = "2", text = "Bhutan" });
country.Add(new { id = "3", text = "China" });
country.Add(new { id = "4", text = "Cuba" });
country.Add(new { id = "5", text = "India" });
country.Add(new { id = "6", text = "Switzerland" });
country.Add(new { id = "7", text = "United States" });
ViewBag.data = country;
return View();
}Output be like the below.
